Recently, we got an internal requirement to send logs to different destinations according to the content. Since our cluster level shipper’s config is already filled with settings to send logs based on the namespace by default, and we would like to make this new feature “pluggable” and can be dynamically set by teams, leveraging admission webhooks appears to be a more reasonable choice. 1
In this series, we will learn about what are admission webhooks, when, and how to use them. And finally, we will make our own admission webhooks.
What are admission webhooks?#
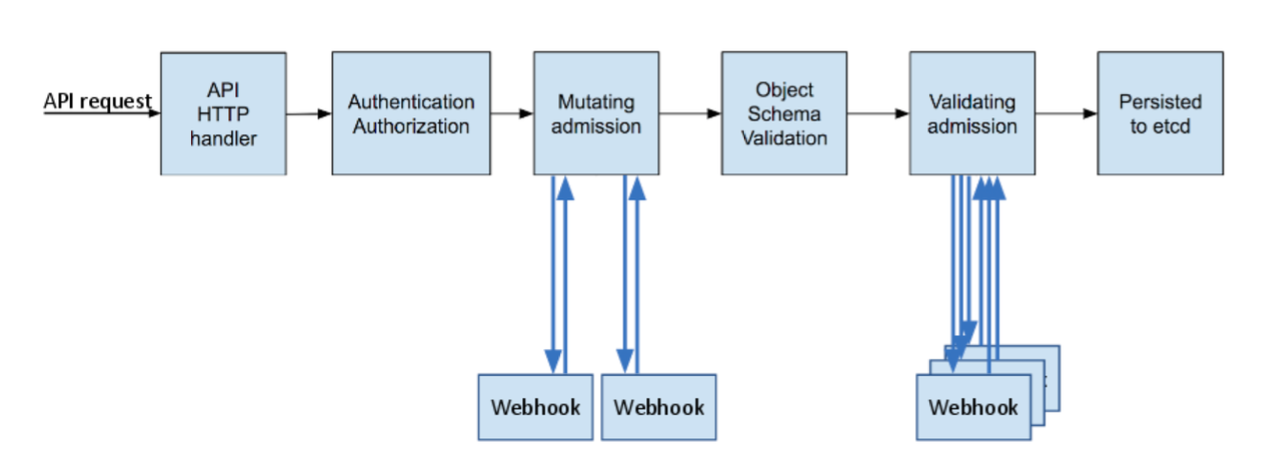 |
| source: A Guide to Kubernetes Admission Controllers |
As you can see above, every request sent to kube-apiserver will go through several phases. The first ones are the authentication and authorization to see who the client is and whether it can perform such action.
Before the object is persisted in etcd, the request will go to different admission controllers. Admission controllers are plugins that intercept the request and perform modification or verification on the object based on its purpose. For instance, LimitRanger admission controller will guarantee that namespace’s resource limit won’t be exceeded after creating the object; AlwaysPullImages will modify the image pull policy to Always. At the time of writing, there are dozens of admission controllers.
You might ask, what do these have anything to do with admission webhooks?
Of all these admission controllers, there are two controllers called MutatingAdmissionWebhook and ValidatingAdmissionWebhook. And you guessed it, they will call the HTTP webhooks you register.
MutatingAdmissionWebhooksits at the mutating phase in the image above. It can allow or reject this request and can additionally mutate the requests.ValidatingAdmissionWebhooksits at validating phase instead. The admission controllers of this phase can only “validate” requests and decide to allow or reject them. Objects at this phase are at their final state, which means they won’t change afterward.
Which applications use admission webhooks?#
There are actually plenty of apps that use this mechanism, such as:
- Policy Engines that allow you to write policies to make sure everything in the cluster is compliant, like:
- ingress-nginx uses validating webhooks to ensure config’s correctness.
- Amazon EKS’ IRSA (IAM Roles for Service Accounts) also uses webhooks to inject credentials.
- Istio uses a mutating admission webhook to inject its sidecar.
- cert-manager.
It’s very likely that your cluster has several mutating/validating webhooks running already:
$ kubectl get validatingwebhookconfigurations,mutatingwebhookconfigurations
Differences between mutating and validating admission webhook#
| Mutating Admission Webhook | Validating Admission Webhook | |
|---|---|---|
| Can allow or reject request? | Yes | Yes |
| Can modify object? | Yes | No |
| Receive object at its final state? | No.May be invoked mutiple times after other mutating admission webhooks. | Yes |
| Common use cases | Sidecar injectionRegistry modificationAdd annotations… | Ensure resouce are setEnsure label/annotations are setEnsure no privileged/host level settings are set… |
When you need to modify or ensure incoming objects to meet certain criteria, you can count on admission webhooks. Most scenarios can be covered by the aforementioned policy engines unless you have some requirements that you need to implement yourself.
When building admission webhooks, the following articles cover most aspects (Let’s take a moment to appreciate well-crafted documents). This post focuses on the areas that, in my opinion, deserve more attention. It is highly recommended to read through the articles first.
At an over-simplified level, you need two steps to enable your admission webhooks:
- Launch your webhook server.
- Create MutatingWebhookConfiguration and/or ValidatingWebhookConfiguration
We will cover the details at later implementation parts and just continue with these two points bear in mind.
Side effects#
Side effects are the changes made to things that are not what you are monitoring. For instance, if you are monitoring the pod’s creation, but instead of only mutating/validating that pod’s request object, you also make changes to other resources (out-of-band data). It can be a ConfigMap, or non-Kubernetes resource like a Route53 record.
If you make side effects, you need to prepare a reconciliation mechanism such as a control loop to ensure the “out-of-band” data is in the correct, latest desired state.
In my log shipper sidecar case, I was thinking about making a ConfigMap to store log shipper config and mount config as a volume to the containers. However, I am too lazy to write a control loop and decided to use init container to call APIs to fetch configs then write to emptyDir volume instead. Otherwise, I have one more ConfigMap to worry about whether it will be changed by other teams.2
Idempotence and reinvocation policy#
Idempotence is one quality you frequently find in Kubernetes. If you are using mutating admission webhooks, it might be invoked several times depends on your Reinvocation Policy, because your mutating admission webhook is unlikely the only one. If you make changes to pods, chances are there are also mutating webhook doing the same.
If other mutating admission webhooks’ changes might affect your logic, be sure to set reinvocationPolicy correctly. However, the reinvocation after other webhooks is not guaranteed, and the reinvocation times are not guaranteed to be exactly once.
In my case, all I care about is the user’s container, and my sidecar/volume are correctly configured; changes made by other mutating admission webhook shouldn’t be a concern for me. Therefore I can just set reinvocationPolicy to Never (default).
However, no matter what’s your reinvocationPolicy, it is advised to make sure your admission webhooks won’t blindly patch objects. For example, if your goal is to add a sidecar named test, do not add it to the same object every time admission webhook is invoked (although containers with the same name wouldn’t work in the first place).
High availability and failure policy#
In the webhook configuration, there is an option named failurePolicy. When your webhook timed out or some errors occurred, the admission controller will go ahead and use the failurePolicy you set to decide what to do next. There are two options: Ignore and Fail.
Remember the ingress-nginx I mentioned above? By default, it uses Fail to ensure no ingress can be created when it’s down.
It’s your job to decide whether a request can pass if your webhook is down or unable to process the request in time. Even it doesn’t work as expected, the cluster administrator should still be notified anyway. Check Monitoring admission webhooks.
Labels or annotations?#
When I was searching for how other people put their configs, I found most of them are using annotations. For instance: Istio uses annotation like sidecar.istio.io/inject: "false" in pod’s annotations.
That made me wonder:
- Why use annotations instead of labels? Isn’t there a
objectSelectorcan be used to filter unwanted resources? - Why not put in high-level controller’s manifest like deployment? If we only monitor deployment changes, wouldn’t it be easier?
It turns out, label’s format is way more strict (check Syntax and character set), for example:
- It can’t start with underscore (
_). - It can’t include spaces (
As for why put annotations in pod’s metadata instead of deployment’s? Because changing annotation of deployment doesn’t trigger the rollout process.
That doesn’t mean labels are not useful, though. You can still use them to match (or exclude) certain resources with the labels you specified. For example, you can use namespaceSelector to exclude the pods inside namespaces like kube-system.
Webhook implementation and certificate#
Implementing the webhook itself shouldn’t be difficult. Actually, I spent most of time testing on the JSONPatch and idempotence requirement.
If you plan to run admission webhooks in your cluster, it also requires a certificate with your Kubernetes service name in it.
But don’t worry, all these details will be covered in The Making of Admission Webhooks, Part 2: The Implementation.
See you in the next one.
Further readings#
- A Guide to Kubernetes Admission Controllers
- Using Admission Controllers
- Dynamic Admission Control
- Monitoring admission webhooks
- Matching requests: objectSelector
- Best practices and warnings
Cover: https://unsplash.com/photos/kyCNGGKCvyw
That requirement ends up injecting an extra init container, two sidecar containers, and an
emptyDirvolume. It’s like turning a toy car into Transfomers. But that’s another story for another day. ↩︎There is Immutable ConfigMaps. But it can still be deleted, so, nah. ↩︎